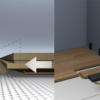
Method 1: Rotate and click
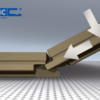
Click the panels into each other along the long side and the short side.
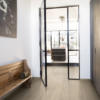
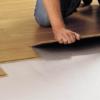
Installing a laminate floor is a breeze thanks to the widely-acclaimed, patented Uniclic® system. It’s much faster and more secure than other solutions. Make sure you follow our instructions closely when installing a laminate floor with waterproof surface into a wet area.
In this step-by-step instruction video you’ll learn how to install Quick-Step Laminate flooring from start to finish:
Click the panels into each other along the long side and the short side.
Ideal for awkward corners. Unlike most other systems, Uniclic® panels can also be joined together horizontally. This is essential when you install the last row of panels or in places where it is difficult or even impossible to rotate the panels (underneath door frames or heating units, for example).
Your subfloor, whether it is concrete, timber or particleboard, should be clean and level.
We recommend the use of plastic sheeting that is at least 200uM thick. This will be available from your local Quick-Step retailer in 2 metre wide rolls.
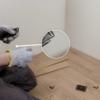
After selecting your board direction and undercutting your door frames, roll out your first row of plastic sheeting along your starting wall. The plastic sheeting should then be trimmed using a sharp “Stanley” type knife, making sure you allow the sheeting to cover the entire floor area and run up the walls and vertical fixtures 50-70mm (the excess will be trimmed off after you have installed your floor). Now roll out your foam underlay and begin installing boards. When it comes time to roll out your next row of plastic sheeting, remember to overlap all joins by 300mm and tape each join well using a vapour-tight tape like duct tape.
For concrete or timber floors in older buildings that are not knowingly or logically wet or moist the alternative to using plastic sheeting than foam underlay is to purchase a Combilay 2 in 1. If there is any doubt as to the moisture content of a subfloor, carry out appropriate moisture tests prior to installation.
While many Quick-Step projects are installed by do-it-yourselfers, the majority of floors are installed by professional floating floor installers. Having your floor installed professionally offers many customers peace of mind. While most professional installers operate reputable businesses, are reliable and carry out all work in accordance with manufacturers’ instructions, it is always worth checking references before employing your installer.
If you need your Quick-Step installed by a professional, simply contact your local Quick-Step retailer.
Unlike many other floor coverings, Quick-Step can be installed over heated concrete subfloors, providing the following three conditions are met:
TIP: For best results, installation should be carried out with the heating system turned off. 24 hours after completion of the installation, the heating system should be turned on and the temperature increased gradually over a 7 day period until the normal operating temperature has been reached.